Appendix F: XSLT stylesheets
Version 3.0 (12 December 2019)
by Beeke Stegmann and Tone Merete Bruvik
F.1 Introduction
XSL (Extensible Markup Language) is a language for transforming XML documents into other XML documents or other formats such as HTML.
This page contains XSL Transformations (which we shall refer to as XSLT stylesheets) to be used with Menotic XML files in order to generate user-friendly HTML. To help users modify these stylesheets, they contain a number of comments explaining the intended effects of the stylesheet.
The XSLT stylesheets on this page are based on a first version developed by Vemund Olstad (2004). Tone Merete Bruvik, Aksis, University of Bergen, updated the stylesheet according to v. 2.0 of the handbook (2008). Haraldur Berharðsson, University of Iceland, has revised the stylesheet compatable with v. 2.0, in order to improve the display of e.g. initials (2014). Beeke Stegmann, University of Copenhagen, developed the latest version (2017), which is compatible with v. 3.0 of the Menota Handbook and introduced substantial changes with regards to the facsimile display of XML transcriptions. Robert Kristof Paulsen, University of Bergen, contributeted to the display of initials in the latest version.
Please note that the current version of the stylesheet is still a work in progress. Preference has been given to the display of features that have been deemed essential, while less common features or special cases might not be rendered correctly – yet – even though they are encoded in accordance with the handbook’s recommendations. Also, not all information contained by the markup is suitable for rendition by a stylesheet.
All stylesheets published in this appendix are available under a CC BY 4.0 license.
F.2 XSLT for Menotic texts
The Menota stylesheet converts a text encoded with <me:facs>, <me:dipl> and/or <me:norm> elements into easily readable HTML display. Over the years, the Menota stylesheet has been adjusted and expanded resulting in multiple versions of “the stylesheet”. The link below is to the latest version, which is compatible with version 3.0 of the Menota handbook. (For older versions click here.)
- menota_xslt_3.xsl (date: 22 January 2021): Download link for XSLT stylesheet suited for texts encoded according to Menota 3.0 (TEI P5 conformant).
Note: Your browser may attempt to open this stylesheet if you just click on the link. In order to download it to your computer, try to right-click (on Windows) or ctrl-click (on Mac) the link instead.
App. F.3.2 below gives instructions for the usage of the stylesheet.
F.3 Applying a stylesheet to your XML file
There are different ways to apply an XSLT stylesheet to an XML document. This section explains the two methods we believe most people might use. The first option is to link to an XSLT stylesheet available online, while the second is to run the conversion locally with an XSL file that must be saved on your machine. Please be aware that in both cases your computer must have a MUFI compliant font installed in order to display all characters correctly, especially on the <me:facs> level.
F.3.1 Online usage of stylesheet by means of link
In order to link to one of the online stylesheets, one simply inserts a stylesheet processing instruction (“stylesheet link”) at the top of the XML document, i.e. in front of the root element. Such a stylesheet link looks like this:
<?xml-stylesheet type="text/xsl" href="http://www.menota.org/menota_xslt_3_facs.xsl"?>In the above shown code line (“stylesheet link”), the @href attribute takes the URL of the stylesheet in question as its value. The stylesheet link in the example links to the XSLT that will display the facsimile level of a Menotic transcription. In order to display the diplomatic or normalised level of the XML transcription, one needs to use the respective URL ending in "dipl" or "norm" instead. Since the stylesheet is an XSL file, the @type attribute of the processing instruction must be set to “text/xsl”.
There are three options for URLs to be used, depending on the level of transcription one wishes to display. (One URL per transcription level; to be copied into the XML file):
1. For display of texts encoded on the the facsimile level: http://www.menota.org/menota_xslt_3_facs.xsl
2. For display of texts encoded on the the diplomatic level: http://www.menota.org/menota_xslt_3_dipl.xsl
3. For display of texts encoded on the the normalised level: http://www.menota.org/menota_xslt_3_norm.xsl
Once you have inserted the stylesheet link with the right URL, you can apply the stylesheet, i.e. perform the transformation. Most editors have built-in functions that read such stylesheet processing instructions and execute them. In <oXygen/>, that function hides behind the round white button with the red triangle “Apply Transformation Scenario(s)” (see image F.1 below). Alternatively, you can press Ctrl+Shift+T (on Windows) or Cmd+Shift+T (on Mac).) If the transformation was successful, your default internet browser will open and the transcription on the selected level should be displayed in a new window.
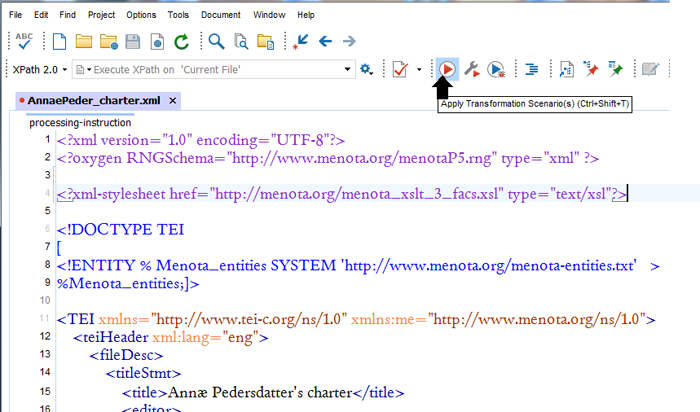
Ill. F.1. The button “Apply transformation scenario(s)” in <oXygen/>.
As the stylesheet is located online, one needs to have internet access for the transformation to be carried out. Also, the transformation might not work, if your document is invalid (most likely, because you forgot to close an element somewhere).
Note: We have tested this method in different – but not all – XML editors. We have encountered issues with some older versions of <oXygen/>, whereas the latest versions of that application seems to work fine.
F.3.2 Download and local usage of stylesheet
To employ the second transformation method, a local transformation, one needs to download the desired XSL file (see app. F.2 above.) While the online method uses three different links – or rather different URLs in the same link – for the individual transcription levels, with the local transformation method one merely needs to download a single file that can produce the display of all three levels, although also only one level at a time. The respective display level is instead defined by the parameter option of the stylesheet (see ill. F.3 below).
Once you have downloaded and saved the XSLT stylesheet, most XML editors will, again, have built-in support for applying it. In particular if you want to execute a certain transformation many times, i.e. apply the same stylesheet multiple times on one or more XML files, you might want to set up a so-called transformation scenario (see the five steps described below for how to proceed in <oXygen/>). Once you have created a transformation scenario, you can associate it with any XML file and apply it over and over again, i.e. execute the transformation on any suitable XML file. After successful transformation the results can be displayed in a browser. (In <oXygen/>, you apply an associated stylesheet by pressing the red triangle button “Apply transformation scenario(s)” shown in ill. F.1).
Note: The XML editor might be confused if you are trying to use both transformation methods at the same time. You need to chose between using a stylesheet link that is written at the top of the XML file and an associated transformation scenario which is set up through the interface of the editor (or called by means of commands). You can select and deselect transformation scenarios in the window “Configure Transformation Scenario(s)”.
Working with a downloaded XSLT stylesheet allows the user to change and customise the transformation instructions in the stylesheet. The output rules in the XSLT of the online method, in contrast, are not adjustable by the user.
These are five steps to set up a transformation scenario in <oXygen/>:
1. Open the window “Configure Transformation Scenario(s)” by clicking the button with the spanner (the grey tool) and the little red triangle (located to the right of the “Apply transformation scenario(s)” button featured in ill. F.1 above). Alternatively, one can press Ctrl+Shift+C (on Windows) or Cmd+Shift+C (on Mac). Press the buttom “New” at the bottom of the list and select “XML transformation with XSLT”.
2. Name your scenario (here: Menota_xslt_Beeke_norm) and choose your stylesheet (here: Menota_xslt_Beeke.xsl) in the box “XSL URL” by browsing through your files after clicking the folder button to right of the box. The contents of the box “XML URL” should be “{currentFileURL}”, which is its default value (ill. F.2).
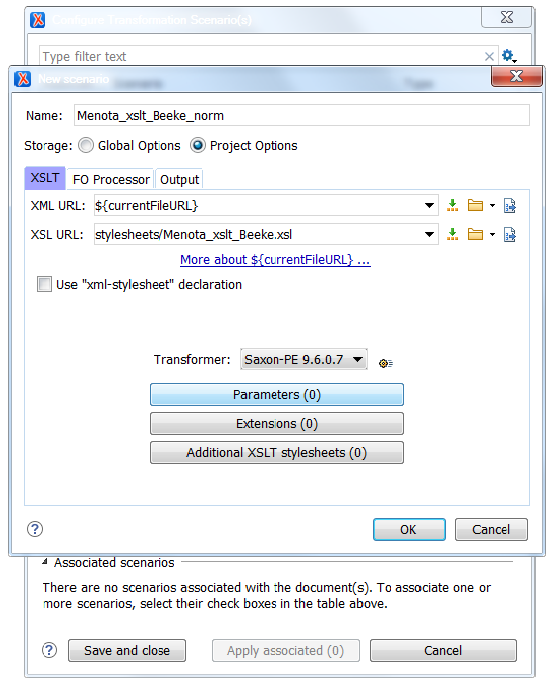
Ill. F.2. Create a transformation scenario in <oXygen/>: Name the scenario and choose the URL of the XSL file..
3. Use the parameter option to set the desired value for the display parameter (“visning”). The possible values are “facs”, “dipl” or “norm”. In the example (ill. F.3), the parameter has been set to “norm”, meaning that the transformation will display the transcription on the normalised level. In order to change the setting, highlight the “visning” row and press the buttom “Edit”. Save your choice, click “OK” and return to the window seen in ill. F.2.

Ill. F.3. Set the parameter option for the parameter “visning” in order to make the stylesheet display the transcription on the facsimile, diplomatic or normalised level.
4. Define a suitable output file and format in the “Output” tab by giving it a location and a name with the extension “.html”. Also remember to tick the box “Open in browser”, so that the output can be viewed immediately in your default browser:
Ill. F.4. Define the output file, which is the basis for what will be displayed in the browser, and its location.
5. Save and apply your configurations.
Note: If the transformation set-up or application returns errors, you might want to use a version of Saxon that is higher than v. 9, e.g. “Saxon-PE 9.6.0.7”. Other potential sources of error are that the newer stylesheets operate with XSLT 2.0 (instead of XSLT 1.0), which is a value that can be manually set in the editor, or that the XML file that you are trying to transform is not valid.
Since any transformation scenario can only take one value for the parameter at a time, you might want to set up three separate scenarios for the different parameters corresponding to the three transcription levels. All three scenarios (ideally with easily distinguishable names) should then show up in your list of scenarios that first appears when you open the window “Configure transformation scenarios”. Instead of having to go in and edit a single scenario every time for the parameter it is using, having three separate scenarios allows one quickly to select the right scenario from this list and apply it to the XML file in question.